I never really understood the mentality of someone that overclocked there computer for actual every day use. Sure, I have overclocked the hell out of computers and had a lot of fun doing it. It can give you a great edge in the gamming circles. But this group of overclockers using refrigerants and liquid cooling on an ongoing basis.. Well it seems a little unnatural to me to save 50.00 on a CPU to get a lesser one to overclock and make up the difference at the risk of the whole system. but some where in there is that self destructive geeky tendency we celebrate screaming to the surface. So with all the focus on making a cold computer case, I decided to make a case into a drink dispensing refrigerator just in honor of the hard core overclockers.
Overview:
When I decided to do this project I started with the desire to do a case mod. Something unusual and different, but I wasn’t sure what. I looked far and wide for a case that inspired me enough that that I would just have to tare it apart to turn it into something else. But what type of case, and what project should I do? Should I make this cool looking, or cool performing? A basic window kit or none at all? So after mulling this around I decided to jump on Newegg and see if I could get inspired, and there it was. The case and the inspiration for the project, the mid tower mini fridge! Next I had to decide weather to use a compressor based refrigerant system or maybe a peltier based heat pump. Sticking with a desire to use some tried and trued overclockers favorites for the actual cooling system, the peltier was the obvious choice. While giving it that air of “look I made this my self and it didn’t blow up!”
The Case:
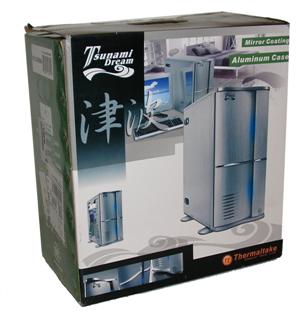
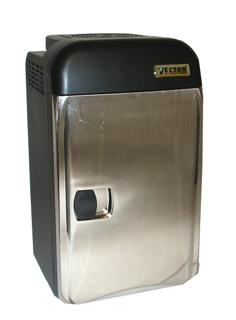
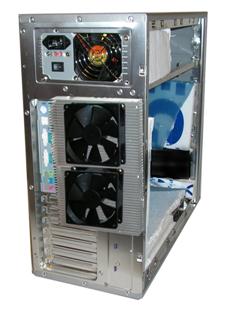
What a royal pain in the butt finding the right case was. I had toyed with several different cases from several reputable makers. So why did I choose this one? Well frankly it reminded me of a refrigerator. The case is all brushed aluminum so it has that nice appliancey feel to it. And the front door opens up just like a fridges doors! It’s a good mid ATX case with some cool lighting effects. But when it comes down to it, it’s a Thermaltake case, and what could be cooler than modding a cool case to be cooler than cool?
The peltiers:
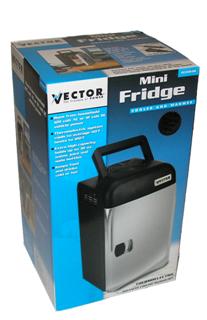
I did a fair amount of hunting for peltiers when I started this project. Peltiers are fairly common devices and they run a rather large gambit of prices. Looking mostly at a price friendly solution I looked for some surplus peltiers on eBay. While that yielded many good useful results, it still was a little more than I wanted to spend. So I decided to go to the ole S-Mart. After some looking at there mini fridges and about a million other products I didn’t need, I found in there camping section the powered coolers. For 14.99 each I picked up 2 of these babies with healthy sized peltiers and all the heat sinks, fans, cold plates and even wiring all ready to go.
Insulation:
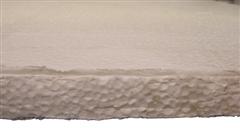
So once you have the ability to cool something down you need to keep the cool where it matters. Home Depot has sheets of Styrofoam board 1 inch thick for about 5 bucks each. This stuff is fairly sturdy as it is laminated on both sides, and this will also help cut down on the mess it makes. We will need just one sheet for this project total.
The Power supply:
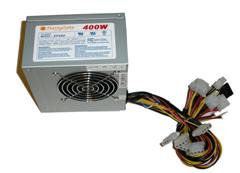
One of the bonuses of using the thermal take case we got is it came with a 400 watt power supply with it! While this cant is mounted normally so as not to suck all our cold air out of the case, its still about perfect as it has a 2 fans in it and draws air out of the bottom to the back of the case. With some simple hotwiring it can be made to run when the power supply is turned on.
Optional Components:
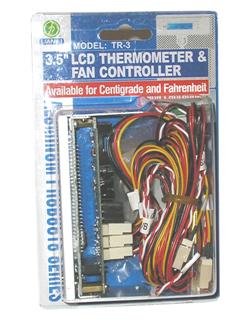
One component that we absolutely had to have was a nice LCD display so we could closely monitor the heart and sole of the inside of the case. We found this great thermal monitor / controller for about 15.00 on newegg.com. This is really nice to add to the case so you know when your cold ones are cold enough.

Great Stuff:
This stuff is really fun to play with! We will use this self expanding foam insulation to both seal any air leaks in the case, but to also adhere the panels of foam together in the case. Just be careful because you will never know trouble like getting this on your skin and cloths
Plexy:
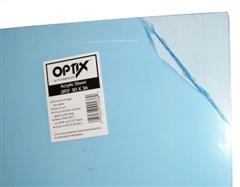
I chose to use plexy in this project because it’s easy to work with and has good thermal characteristics. If you used a window kit in your project this also adds a “cool” factor for lighting and what not.
The uncorrupted min-fridge is really a splendid gadget. By reversing the polarity one can turn it into a mini heater. I installed a diode after some testing to make sure that was imposable for me! There are several brands and makes of mini-fridge out there, but they all probably use the same vendors for the peltier as there are few manufacturers. One thing to closely look for on the packaging is the power information. All the mini-fridges we looked at had some form of watt consumption on it. We got the biggest ones we could get in this unit some where about 65 watts each.

So our next step is to start liberating the peltier from the housing. When I started this step I thought it would be real easy… boy was I wrong. They used those damn torqs type screws with the post in the middle of them so none of my torqs drivers would work. And additionally they also used one of the longest drivers I have ever seen in an s-mart tare apart. I ended up just taking the darn thing and getting a 1/2 inch drill bit so I could just drill out the holes and there for the posts in the case. After that it was just a matter of jumping on both sides (causing the deformation to the sides you see) and then some mild expletives while trying to remove the Styrofoam with out making a nightmare level statically charged mess. But with that all said I found out that sears had the tool I needed for about 5.00 or so. meh… so if you do this… you can choose the road you travel.
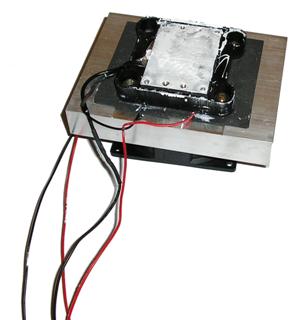
The peltier is attached to an aluminum pan with 4 small normal Phillips screws, and was relatively easy to remove. There is a thick layer of thermal compound on the cold plate that is sandwiched between the peltier and the aluminum pan. We want to leave the cold plate attached there for us to use, but every drop of the thermal grease must be removed. Not even the slightest film of it can remain or future steps will not go so easily. Using some rubbing alcohol and a nice cloth, or a old sock, and preferably some Q-tips clean every last speck off of the block and your good to go. Additionally, there is a small thermal resistor inline next to the block on the negative side of it. Cut that baby out as you want your cold ones nice and cold.
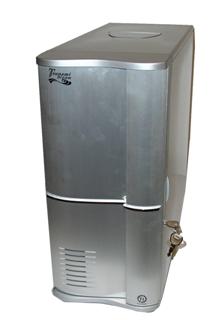
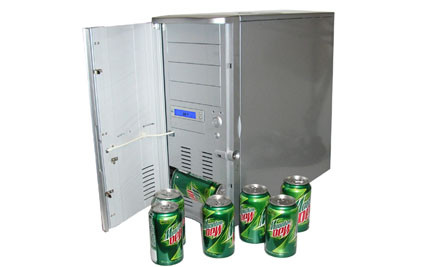
The thermal take chassis. This is a really nice case. One of the nicer things about this case is the lock you can see there on the side. This means you can keep your cold ones cold with some security from room mates or peeps in your dorm room.
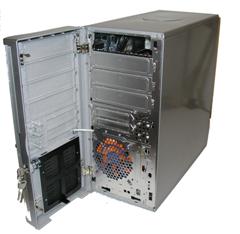
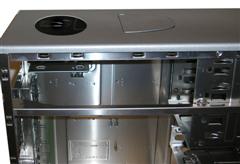
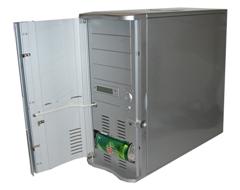
With the key turned one way it locks the whole chassis, middle lets the main front door open, and turned the opposed way from the locking position lets you open the whole front bezel like a door. We will be doing a lot of modification to this area to accommodate both a dispensing hole, but also a way to refill the fridge as well.
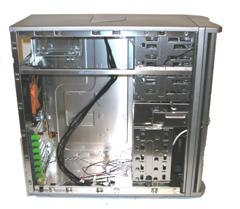
So here is our side view. Everything in this case is aluminum, as it should be! The hard drives have a removable tray as does the floppy. Those and all other internal goodies like fans and cables will need to be gutted to make room for the stuff we want to do to this case.
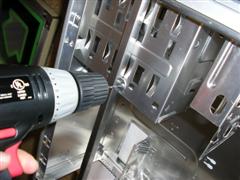
The main internal structure for this case is held together by aluminum rivets. The only way to remove these beauties is to drill them out. Using a 1/8th inch drill bit, make sure you get a good self tapping metal bit. (that’s the medium your drilling into, although if your interested in a bunch of drill bits made out of wood leme know, I also have a nice bridge in Brooklyn for sale.)
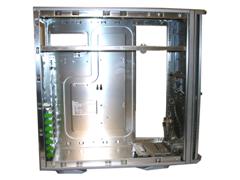
So here is the case all gutted. With all the internal structure removed there is a lot of space available inside for all the other work we need to do to this.
So the final step we need to take in this fab process is to put a nice big hole in the top of this case for the power supply to breathe through. Using an 80mm hole saw we got at the local hardware store measure and drill a pilot hole where the power supply’s bottom fan should fit. using the hole saw in reverse in aluminum helped it start into the metal with some ease then put it back in forward mode to finish off the hole. Fair warning, hold your case and drill very tightly as aluminum is very soft and doesn’t mend well from dings and scratches from a hole saw bouncing across the top of it.
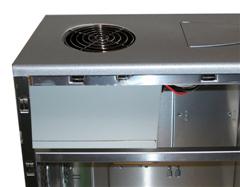
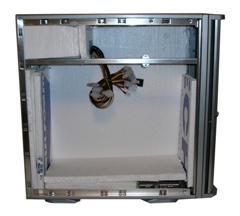
The first main challenge with this build is mounting the power supply, fortunately that’s the easy part as it only takes one hole to be drilled and then just screwing it in. the main bulk work it cleaning up the cabling. frankly, after messing with it for far to long… I cut everything off the power supply with some wire cutters other than the main plug so I could easily jump it to always be on and one set of Molex connectors for the peltiers. Make sure when you mount the power supply that it can breathe nicely as you see here.
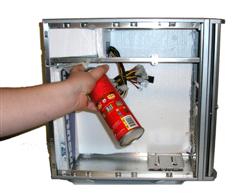
So now we start installing the insulation in the case. The Styrofoam is really easy to work with, just a bit messy. Using a nice serrated bread knife just measure and cut, if it’s to bit it will squish into place a bit. To small and a little expand foam and your good. Seal around the power supply carefully to make sure that it has an air tight seal. You don’t want to be using your cold air for your soon to be cool ones to cool a power supply!
Now we start layering the foam. 2 layers should be about enough and 3 in the rear as that’s where the heat sinks are. Just use a little of the spray foam to seal the joints and glue the peaces together.
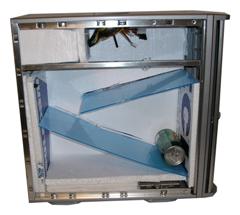
Next up is a trial fit of some plexy I cut as the shelving. Using some cardboard I cut and shaped and experimented to make sure I got the fit right then I traced it onto some plexy. Make sure to cut it wide you can cut a notch in the foam that it can sit in for support.
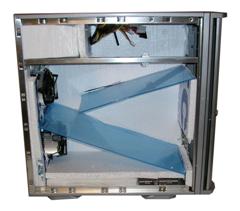
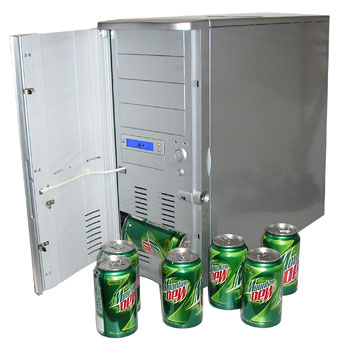
With the ramps in place cut 2 holes in the back of the case and in the foam as well for the heat sinks. Just trace around them when you cut the foam, it doesn’t have to be super precise as you can fill any gaps with the spray foam. Finally, wire the internal fans into the power supply lead. One other thing to note is the hole in the front of the case. We cut this out so the drinks can roll right out the front of the case. But as there is a cap between the inside and outer cases the cans come to rest in the gap nicely.
So the final assembly here is really important. I used glue, and some more glue, And finished up with more glue. So the process went something like this. I used some hot glue to glue the heat sinks to the case. With that done I then used some clear silicone to seal around the heat sinks so there were no air leaks. Then I used some artic silver epoxy to glue the inside heat sinks permanently to the peltiers cold block. (Make sure it’s super clean or the epoxy won’t stick.) Then I finished up with some spray foam on the inside. It was a really easy assembly. And the artic silver epoxy is super strong stuff and very thermally active stuff!
So with some foam glued to the inside panel and the wiring all done, all you have to do is plug the unit in and it’s immediately hard at work cooling your cold ones just for you.
Final Thoughts…
This was a really fun project to do. I recently brought it fully loaded to a LAN party with a bunch of my fellow geeks. At first I let them guess at what it was. First impressions were that it was a water cooled computer. But when they saw that there was no mob installed through the IO shield they were all stumped. So I plugged it in and popped open the front and with a solid sounding “Ka-Thunk” a Caffeinated cold one was waiting for all night consumption.
The only thing I would like to have done to this is to add a USB activated solenoid to dispense them, this would be real easy to do using an USB relay kit for experimenters. But either way the cold one will keep rolling along I think.


[…] Y luego están los habitantes de Planeta Friki. Unos curiosos personajes que cogen el ordenador, le abren las tripas, vacían el interior y lo reconvierten en una nevera de latas. Si te pica la curiosidad Friki o te apetece llenar tu dosis de bricolaje del domingo, toma nota. Dicen quienes lo han hecho, que sólo necesitas 30 minutos de tu preciado tiempo, unos 200 euros para comprar el material y un poquito de inglés para entender las instrucciones. […]