I have wanted to do this a project for a long time and with earth day this year it kinda just fit timing wise. Its really a simple and quick build, yet getting the level up in bio-friendly-geek makes this all the more fun. Now I admit that I have a lacking of unquenchable aspirations to being a hugger of trees or a crusader of tofu and hemp. But I do believe in making changes so that the poor saps that come along after me might have the world a little less badly off for them. Let’s face it, we kind of effed up the whole earth thing… but watching the rhythmic bubbling in 12 clear pipes with green goo floating in them makes me forget it all.
But in all seriousness, once we get a good strong colony established we will be doing some testing of the amount of carbon these can remove from our environment with a C02 PPM meter. Now just myself doing this project all alone will have a minuscule effect I realize. But there cheap enough to build that some variant should be able to be installed in every house hold. The cumulative effect would be far greater obviously. But more over it would have a far greater effect on the environment than not doing it… (Until everyone starts dumping huge quantities of plankton down there drains and into our local water drainage, lakes, rivers and oceans.)
Killing a Tree:
So we will be starting this project by killing a tree and removing its heart (wood) for our project. Basically we will be building a fairly simple frame to hold our acrylic and pumps. Could you use reclaimed or recycled wood products? Sure! if you have them locally or on hand… if not don’t burn off that gallon or more of gasoline driving 20 miles and back from a recycler…. just go to the home center around the block.
Acrylic:
For this project we will be using some acrylic sheet that is 1/2 inch thick. This will be cut using a hole saw to make the plugs for the tube ends as well as making the holes for the plumbing. Now I realize that everything can be measured in carbon and energy required in making a product… and I realize that I will get email saying how plastics will kill the earth. Well… your likely right. So I wanted you to know preemptively that I actually got this magic carbon / pollution free acrylic from my future self coming back in time with a carbon free time machine to give it to myself so I could feel guilt free about using it. For those not fortunate enough to have a future self with a carbon free time machine and carbon free acrylic just go to your local plastics supplier. (Use your phone book, yes it’s in there)
More Acrylic:
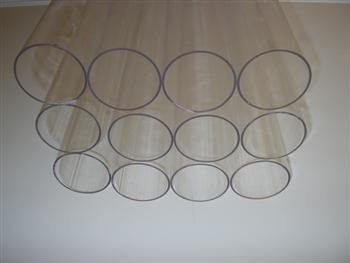
These are 3 3/4 OD 3 1/4 ID Cast acrylic tubes. There are two types of acrylic, cast and extruded. It’s important that you use a cast acrylic tube for this project. If you use extruded acrylic it will eventually crack under the pressure of the water in the tubes and you will kill an entire plankton colony thus lending to the over demise of the planet some how…
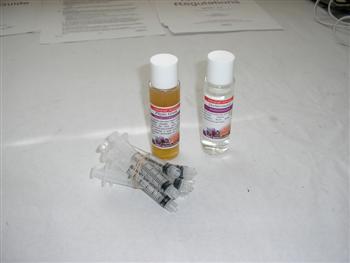
Life Support Chemicals:
To help keep our plankton happy we have both de-chlorinator and a phyto-grow plankton fertilizer. This stuff makes the plankton really take off and I highly recommend it. Fair warning though, it smells kind of like pee after taking a good multivitamin. So don’t get it on your hands just in case. I did buy it off the internet after all.
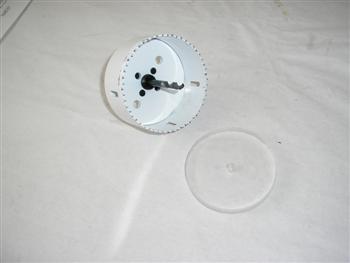
The Hole Maker:
For this project I recommend a nice sharp hole saw. We found a 3 1/2″ hole saw at our local home improvement center that had a 3 1/4 ID. The only catch is that the acrylic can get stuck inside so have a screw driver handy to prod it out.

Air Tubing:
This is your basic run of the mill aquarium air tubing. Nothing to special about it other than we used three twenty foot packages for the build. When you buy this it’s good to look for hard kinks in it. You need a nice clean 20 foot kink free run.
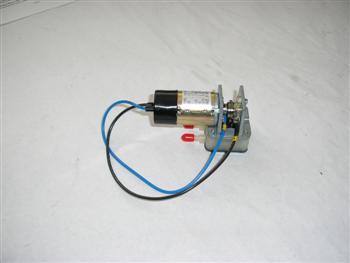
The Pumps:
We found these WISA air pumps on eBay for 8.00 each. The cool thing about them is that they have a input and output on them so you can easily capture the air and pass it along. These are surprisingly high volume and 6 of them in parallel ran great on our 45 watt solar panel kit.
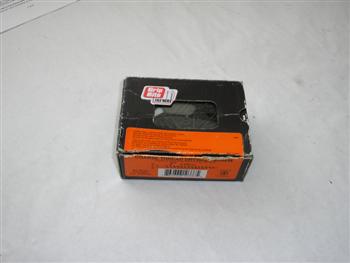
Screws:
A box of basic drywall style screws will hold most of this together. There cheep and don’t rust easily. Don’t use nails to hold this together, the pumps do vibrate a lot and it would work the nails out fairly quickly
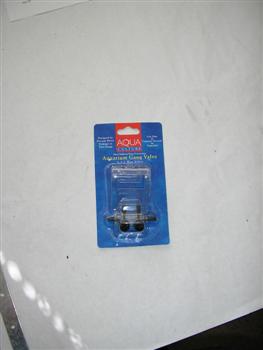
Air Valves:
We picked up 2 of these dual valve kits at our local super mega gigantic crap you don’t need mart along with the air tubing. The cool thing about this is it lets you mix and even recycle air through the reactor with very fine control. One other highlight of shopping at the local super mega gigantic crap you don’t need mart is most of the useless crap in them are made overseas. So ultimately were not polluting here making lots of useless crap we don’t really need. And that makes it there problem not ours right?
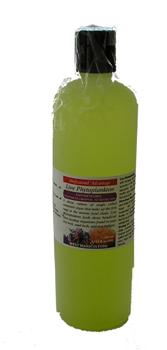
Live Phytoplankton:
We went with a mix of 2 species of LIVE plankton microalgae for this project. Nannochloris and Nannochloropsis are both hardy fresh or salt water plankton microalgaes. We mixed a very slight salt concentration into the system to help these adapt to either condition easily. Once your reactor takes off it really pumps this stuff out. There are lots of aquarium enthusiasts who would love to come drain half your tank (to reduce the concentration) and take those happy little planktons home to feed to their happy little under water worlds.
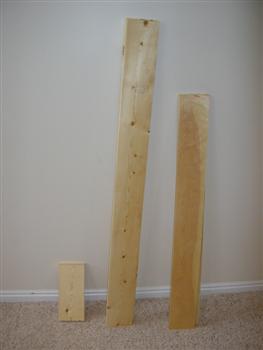
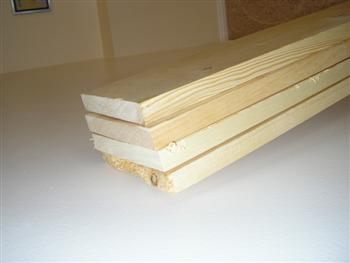
We picked up four 8 ‘X 1″ X 6″ pine planks at our local home center. We cut them to the following:
2 – 6′
2 – 2′
2 – 7′
2 – 1′
We use all the lumber excluding scraps other than the saw dust we burned with the plastic shavings for good measure. Just kidding, we sent them to the land fill. hahah just kidding again, we mulched them. (Is that the right answer?)
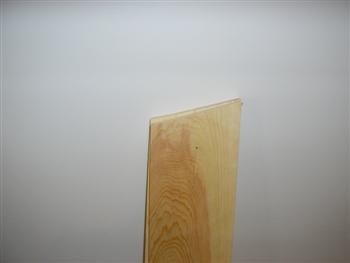
The bottoms of the 6′ and 1′ board we will cut a 15 – 30 degree cut so the stand sits at an angle for better light exposure. Choose the angle the frame will be standing at carefully by watching how the light affects the area you want to put this.
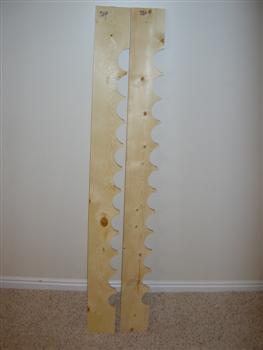
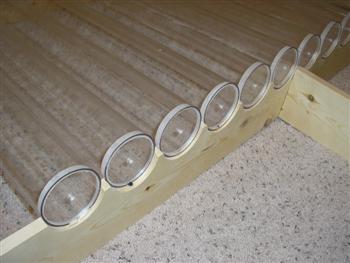
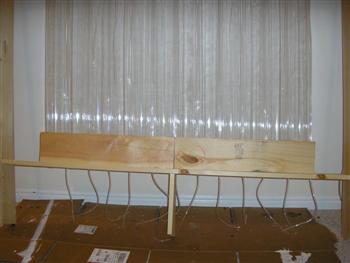
From the center of the 7′ boards space out 3 3/4″ holes with one inch gaps between them. Leave 6″ between the last cut and the end of the board for air flow. A little tip is to screw the boards together on top of each other and hole saw through them both at the same time.
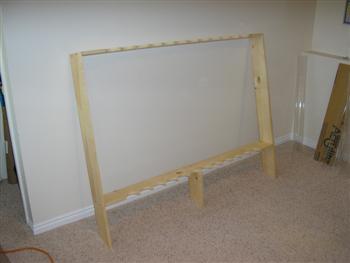
I think this picture should be self explanatory enough. Honestly what could I say… screw it together and don’t get your hand between the screw and the wood? Maybe eat some hummus as a snack?
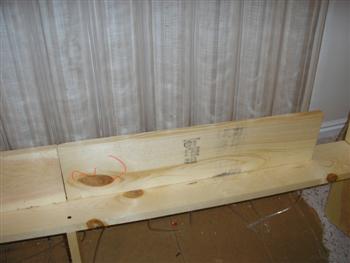
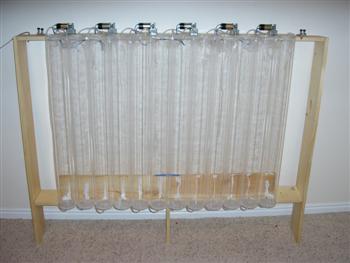
Here is a quick test fit of the tubes. It’s starting to look really cool. But I realized that I needed to redistribute the weight a little differently. Where did those two 2′ scraps go to again?
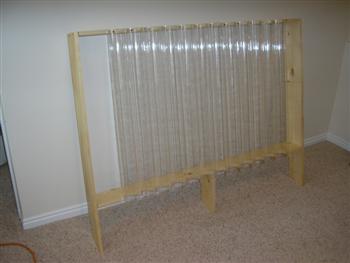
Using the stand as a jig, place the tubes in their respective slots. Place the ends into the tube ends and persuade if needed with a hammer or rubber mallet. Over drive the ends 1/2″ extra into the tube leaving a gap. Using some weld on #3 acrylic cement glue the tubes into the tube. Once the glue has cured diagonally drill a 1/8th” hole through the cap and through the side of the tube staying in the cap end the whole time. Fill the hole with thick CA hobby glue and using a 2 1/2″ long drywall screw, screw through the cap end and into the wood frame to anchor the tube to the frame. This will also add a lot of structural strength to the frame as well.
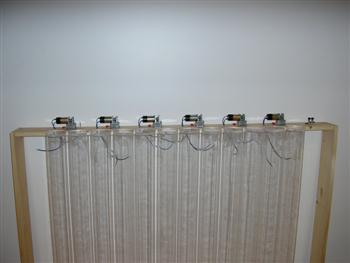
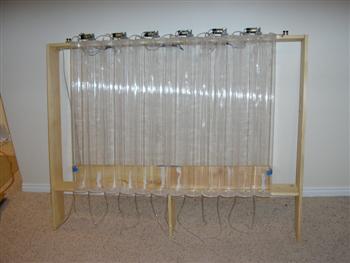
Next up in between each of the tubes mount one of the pumps to the top of the frame. If you want you could do it to the bottom instead… but I don’t really care. This is how I did it…
Here is a quick shot of all the pumps in place. Note that the protective caps are still on the pumps. Keep them there until your ready to put something in them.
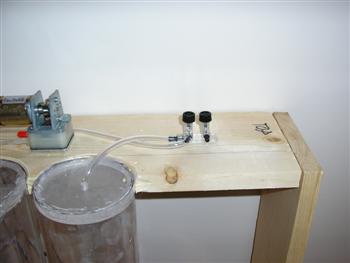
At the right end of the reactors frame we hot glued one of our valves to the frame. we modified it slightly with a plug so it no longer passed through but required the valve to be open.
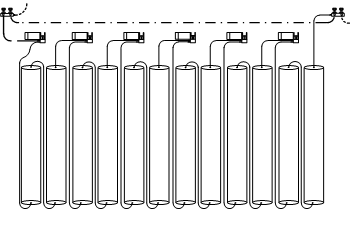
Here is a diagram of the air hoses. Note that you can choose to recycle a portion of the air by adjusting the outlet valve and the recirculation valve on the right
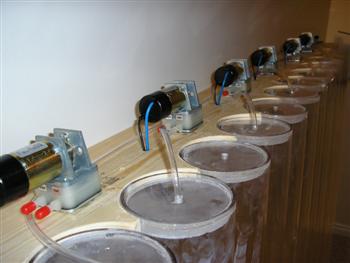
Every other tube we will connect to the input on a pump to boost the air pressure along the array of tubes. The seal from the second tubes outlet to the next pumps input should be air tight as there is no booster pump between every other tube and you want the pressure to do the work for us.
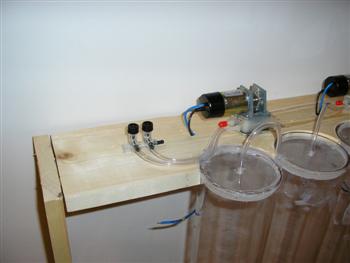
Here is the input valve. The valve on the right is the recirculation back pressure valve. The knob on the left is the input line to the first pump. The stem on the right is the input to the system from your CO2 reeking house and or apartment, or factory, or forge, or maybe you smoke a whole lot… or like lots of soda pop… I dono, some CO2 source.
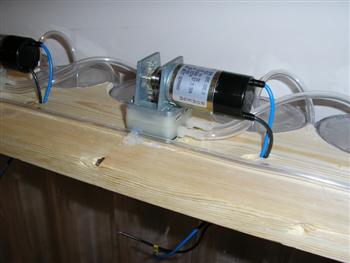
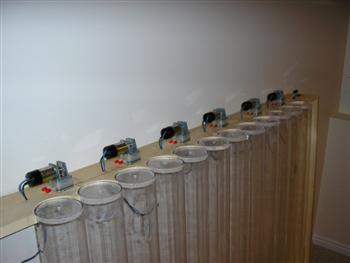
Here is a shot of the back of the rack. The line running from left to right is the recirculation line. You can see here the output lines being hooked up now. A few dabs of hot glue hold the lines down really well and hold very well on the pine.
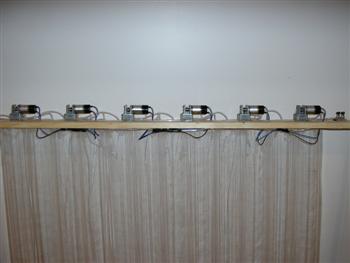
Here we have the electrical all cleaned up now. Just wire these up in parallel and your set to go on a 12V power source. At this point I couldn’t help testing the pumps. These pumps operate at a fairly high speed and together they resonate nicely. But there was a lot more noise pollution (a different type of pollution) than I thought there would be. When the tubes are full of water there less create less noise pollution so don’t freak out until it’s filled up.
Here we have two things going on. We decided to distribute the weight a little differently and we see the air lines running between the tubes down to the bottoms of each tube.
Close up of the frame modification, basically we will use some liquid nails (glue) to attach the two 2′ boards to the frame as well as to the tubes. This will help take the load off the bottom of the frame and the ”I “shape will distribute the load more evenly.
Here is a front view of the frame with the liquid nails applied and drying. All we have left to do is the bottom plumbing.
Now we left the lines running down a little long for a reason. We need this super water tight. Insert the line into the hole from the hole saw and loop it once in that extra 1/2 inch gap we left. Using healthy amounts of a silicone (I like clear) fill the half inch gap and imbed the hose in it. A little hot glue can be used to make sure the loop of extra hose stays put.
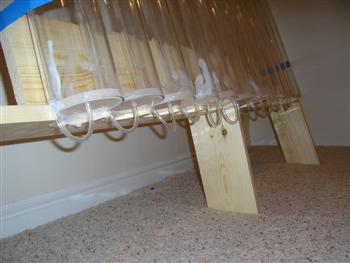
Here is what we get when were done. Now on the first and fourth tube you can see a little glue seeped up inside the tube showing the weld on glue didn’t make a perfect bond. It’s better to try to kill these leaks now than later.
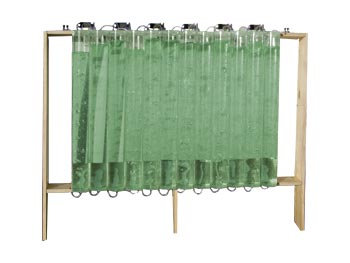
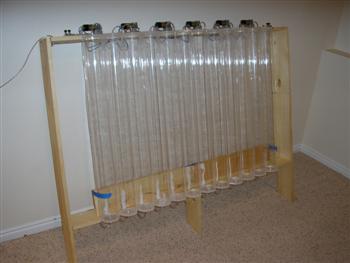
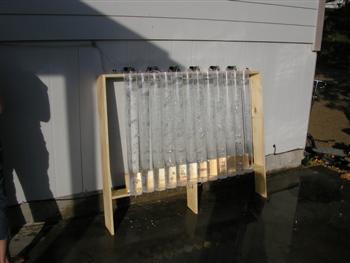
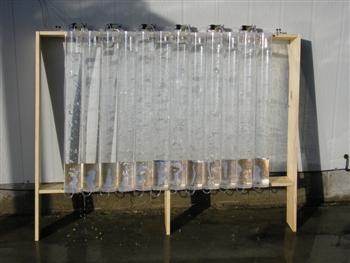
So at the end of an afternoon here is our finished photo-bio-reactor. With the parts on hand it’s a fast build and the only hold up is waiting for the glue to dry.
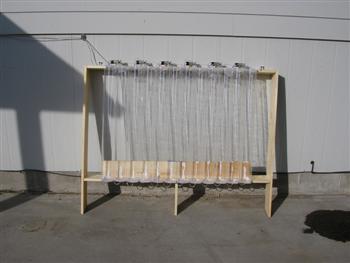
So we found a sunny place that we want to put our reactor at. This side of the geek studio catches a lot of noon to dusk light. If it was not quite sunny enough of a spot I would have likely added some Mylar or something similar to the back of the frame to reflect light back into the reactor.
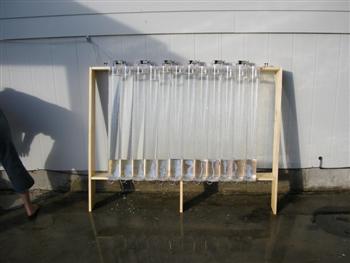
The filling process was really straight forward. But I learned something I needed to include earlier. Drill a second hole in the tops of the tubes as an air escape as you fill it up. It makes filling a lot faster. Just remember you need to plug them up air tight as well. I just used some small rubber stoppers I picked up at the local home center.
With the daylight fading I got the reactors final hookups complete. I chose to run a line from the vent from our furnace and water heater up on the roof to the reactor. The power for our reactor is from a harbor freight 45 watt solar panel kit. The kit includes everything you need excluding a battery. But that was fine because when it’s dark it doesn’t really matter if it’s not bubbling away. Once again I really was surprised at the amount of air those pumps put out.
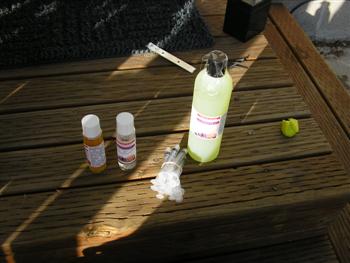
So before I called it a night it was time to inoculate the tubes. Using that second hole I drilled in the top cap I added the de-chlorinator as per the instructions. The little syringes really help in adding the stuff through the little 1/4″ holes. Next we added the plankton and fertilizer per its instructions. The microalgae was 12 oz so we put 1 oz in each tank. You really couldn’t see it at all in the water. But in a few days the water starts to green up.
So here is day 2. No change to the reactor. I did note that I had to add an inch of water to the first tank. Not because it leaked out but that it had evaporated. On hotter days I think that may be a problem, but nothing a nice slow drip system couldn’t fix. From a rain water recycling system of course. Because wasting water is bad mkay.


Do you know the specs for the air pumps you bought? I tried looking for wisa air pumps but I can’t find the exact ones you used in this guide.
We have started using a couple other pumps.
Marine Metal Power Bubbles 12-volt Air Pump
http://www.amazon.com/gp/product/B000EYWNVQ
Or
DC 12v Water Air Pump Mini Small Diaphragm Pump Pressure Vacuum Sunction Pump
http://www.ebay.com/itm/DC-12v-Water-Air-Pump-Mini-Small-Diaphragm-Pump-Pressure-Vacuum-Sunction-Pump-/361355584927
Where do you guys get your cast acrylic tubes? Online sources are quite expensive… $45/foot