RC Airsoft Turret

As promised here is version 2.0 of the airsoft turret project. Based on an overwhelming amount of fan feedback from the first project we decided to make the platform a little more flexible by supporting both USB and Radio Controlled interfaces so more people with different interests will be able to tinker with it. So for this project we will be detailing the construction of the turret and building the base as more of an experimental platform so you can choose what method you want to use.
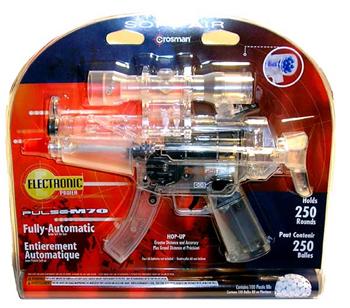
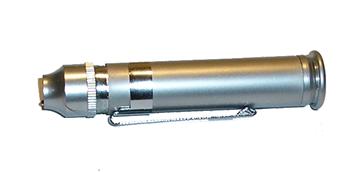
The Airsoft Gun:
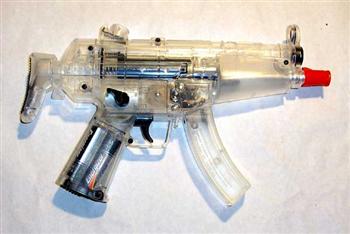
We picked this little beauty up at the local mega-lo-mart for about $19.00. There are mainly 2 different types of airsoft guns, CO2 and Electric. Now don’t let the electric title sway you. This gun is capable of 350 rounds per minute at 175 FPS and runs on only 4 AA batteries (6 Volts DC) and is perfect for all the modifications we will need to do to it. Alternately if you wanted to use the CO2 Powered versions you would need to come up with a mechanical method of firing them.
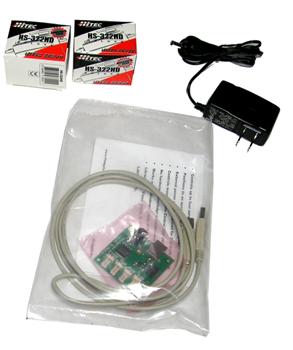
The USB to Servo interface:
Phidgetsusa.com makes a really great USB servo controller kit that I have to say was an absolute pleasure to use. We chose there 4 X Servo kit so we could use up/down Left/Right and fire controls leaving one extra channel open for the imagination. Full source is on there site and this will work with everything from C++ to javascript, php, and .net alowing for you to stream video feed of this and control it over the web with almost no effort at all. $70.00

Team Delta’s Relay interface:
For those geeks out there who have any interest in robotic combat, Team delta and there robots should be almost a household name. Turns out these guys branched out and have created some really nice relay kits for your standard RC radio that are exactely what we need for our fire control system. $30.00
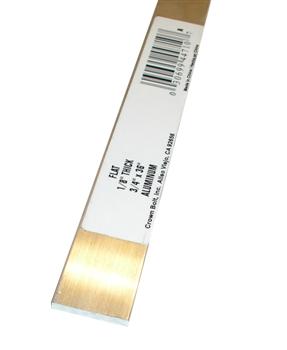
Aluminum Stock:
We picked this up at our local home improvement store. 3/4 X 36″ X 1/8 for about 5.00. we will be using this for the cradle that allows for movement of the turret, and because its aluminum it’s easy to work with. $5.00
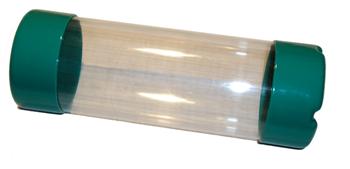
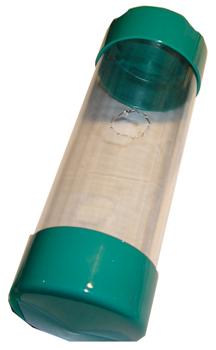
The Ammo Container:
While at the home improvement store we found these cheap little part holders. These will work great for holding large volumes of airsoft ammo and providing a quick refill feature as well. $3.00
Laser Pointer:
We picked this laser pointer up at our local mega mart for $3.00. This was the perfect item to put on the 4th channel of the servo controller using an additional relay kit. Every good turret has a laser on it somewhere…
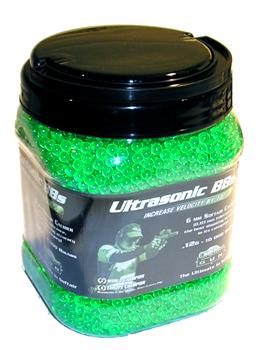
The Airsoft ammo:
While at our local super mega low mart we also found a huge tub of airsoft ammo that we couldn’t pass up. The bright green not only looks cool, but takes pictures well to boot. This tub of 7,000 rounds set us back only $10.00
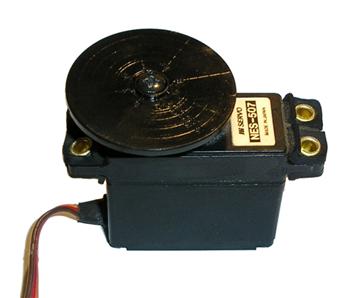
The Servo’s:
The radio we had laying around we used for this project had some servos with it that were good enough. It’s a good idea to pick up some high torque servos. They have a slower rate of travel that actually is good for accuracy with the bonus that they can handle the weight of the turret more gracefully. $15.00

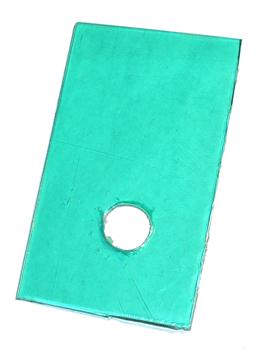
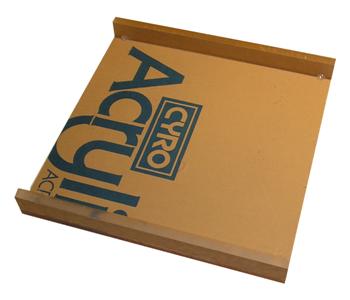
PlexiGlass:
For this project we will need several pieces of 1/8th thick plexi for the airsoft turret. the base in this project we just used some old dance deck project tiles that we had laying around so we had something clear and see through for a base so you all could see what we were doing. You can make whatever base you want, ours is just for demonstration purposes.
Sides .75″ X 3″ Front 3″ X 3.5″
Top 3″ X 5″
Back 3″ X .5″
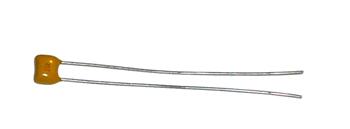
Noise Suppressing Capacitors:
One of the most important parts of the project if you go with the radio controlled version of this project. The noise canceling capacitor is attached between the posts on the motor to help reduce the amount of electrical noise that is put out by the airsoft guns motors that can interfere with the radio controls signal. $3.00 (teamdelta.com)
One note on power tools: use them at your own risk. Be sure to read and understand any and all documentation on the tools you use. No amount of documentation can make up for experience, but there are many people with serious eye injuries from the school of hard knocks. If you don’t know what you are doing, don’t do it, and find someone that can help.
Step one of this modification is to remove the airsoft gun from the packaging. This can be done with heavy metal shears, some form of laser beam or possibly a high power particle beam weapon. I really hate the tamper resistant packaging this comes in!
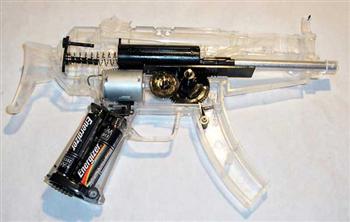
Next up we will be disassembling the airsoft gun. There are 8 screws that hold the 2 halves together. The innards are under tension from a large spring in the pneumatic cylinder of the airsoft gun. When you separate the gun halves expect it will energetically remove its self from the gun for you.

Next up is to totally remove the innards of the airsoft gun from the shell it sits in. this is not a hard process but its important not to lose any of the gears or motor.
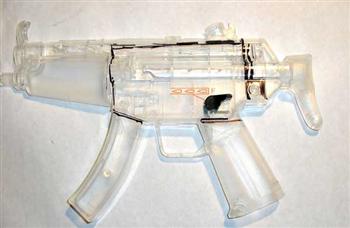
After careful examination of the shell we found a way to cut it down dramatically. To do this it’s important to make sure where any reinforcing walls and screws will need to be to hold the thing together once you’re done hacking it apart.
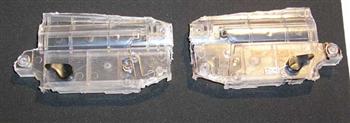
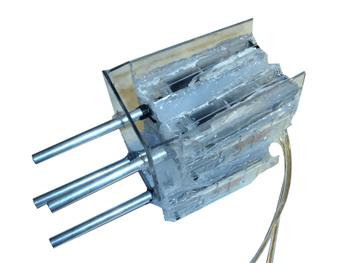
After some quality time with the dremal tool we were able to arrive at this end result. Two separate and matching halves of the gun creating a compact module now for our use. Fair warning though, it more melts than cuts, so watch for hot plastic.
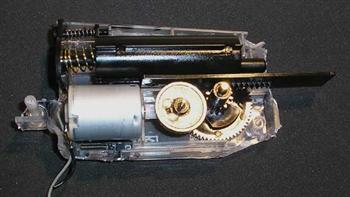
The next step is to start assembling the innards like they were prior to disassemble. This can be a tedious process with the spring loaded pneumatics but should not present too much of a problem overall. Make sure you have good enough leads from the motor at this point as you don’t what to redo this step.
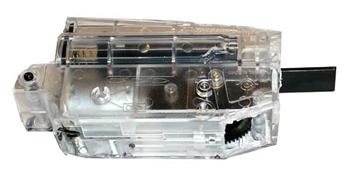
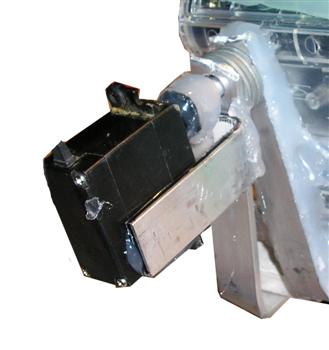
So here is the new firing module we have created. One special note here is the black tab we waited to modify this until the very last moment as it’s critical to the fire control sensor. The sensor detects when the gun has fired and send a kill signal to the USB controller to stop the firing motor. When you cut this black tab it must extend 1/8th of an inch out of the front of the housing so it can contact the sensor. Less than this will make it fire infinitely, and more than this will make it hit the sensor to hard and prematurely ware it out.
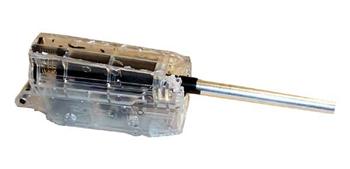
Finally take the barrel of the airsoft gun and insert it into the mounting bracket. In the original gun body it fit into a slot in the rear and the front of the gun loosely held it in place. We will need to use a shot of that super glue to make sure it stays put. The only challenge will be that if you get one drop of glue in the barrel at all it will likely permanently glue the pneumatic cylinder in place. So use great care when applying the glue on this step.
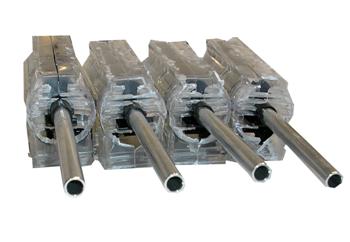
Repeat the instructions for making the small airsoft guns 4 times so you wind up with 4 mini airsoft guns. It is important to make sure the airsoft guns are uniform.
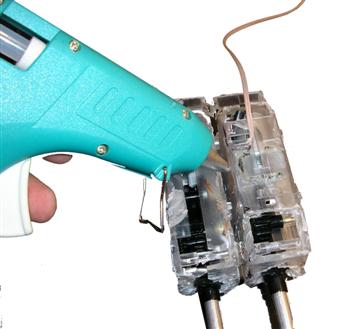
With the mini airsoft guns made we will need to attach them together side by side. We will be using hot glue to make 2 modules exactly the same composing of 2 airsoft guns each.
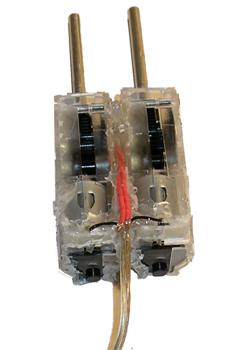
After the airsoft guns are glued together wire the 2 guns together in parallel (not series). Imbed the wires in the gap between the guns and use hot glue to secure the wires. Don’t build up the glue above the height of the base or they won’t stack well.
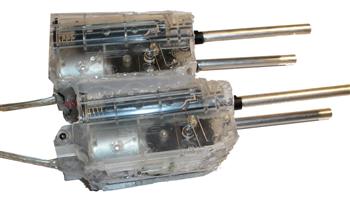
Take the 2 modules and glue them together staggered so there is .75 inch of the lower gun exposed so its possible to feed ammo down to the lower gun.
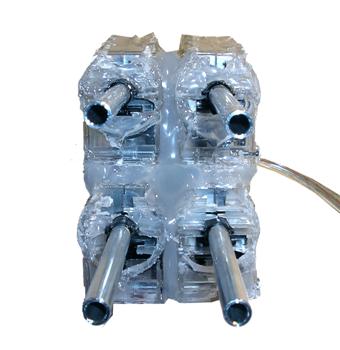
Using hot glue fill any gaps in the front of the newly created quad cannon so it’s as smooth as possible. This will help with the balls feeding into the gun and prevent jamming and slow feeding.
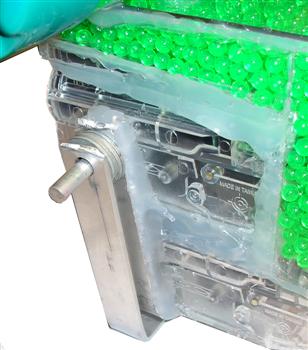
Using the Plexiglass peaces to build a box around the front of the turret. Mark and drill holes in the front panel for the barrels to poke through. Next build up the height of the turret so there is room for the balls to feed into the top.
Next, take the top panel of the turret ammo holder and drill a 1 inch hole in it so the ammo can feed into the gun.
With the top panel hole cut use it as a template to trace the hole onto the part holder that will hold all the ammo for the airsoft turret. Use a sharp razor to carefully cut a hole in the middle of the turret.
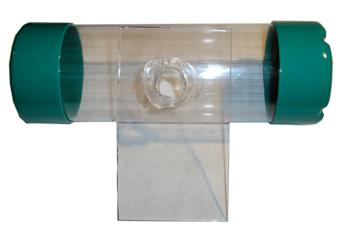
Using some hot glue apply a generous amount around the hole in the panel and line it up with the ammo hopper, attach it and let cool. If hot glue oozes into the hole use a razor to clean the hole out so its not obstructed.

Once the hot glue has set in the top pannel use some hot glue to attach the pannel to the top of the turrets ammo feeder we have alredy assyembeled. One tip i learned at this phase is to make good and sure there is no debris that can get into the airsoft guns ball feeder.
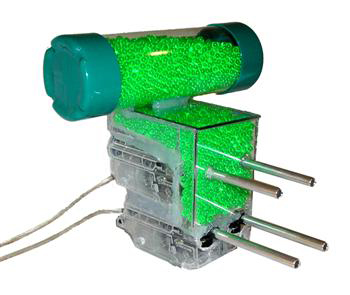
Here is the turret gun loaded with ammo. I have to admit this was absolutely a blast to test fire. Its rate of fire is really awesome. And the projects you could use this for are quite varied.
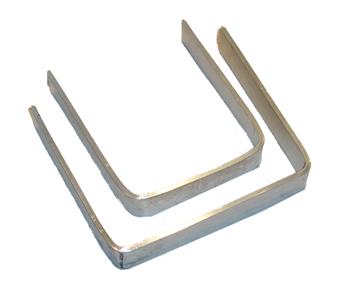
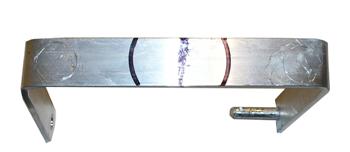
Next step is to take the aluminum we picked up and cut it to length. Drill holes in it and bend it to shape. Aluminum is very soft and easy to work with. We used a 9 inch and a 12 inch length of this aluminum bar for our turret.
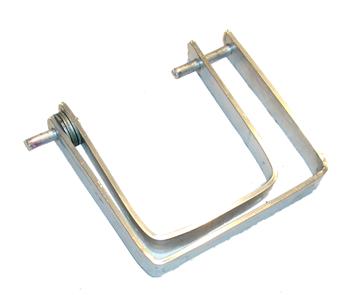
With the frame bent and drilled use some aluminum rod the same diameter as the hole you drilled and pound it into the holes (it should be tight). Drill the opposing holes out 1/16th larger so the rods spin freely. Use washers to help center the cradle. Cut any protruding material into the center space of the cradle flush so it won’t bind on the gun itself.
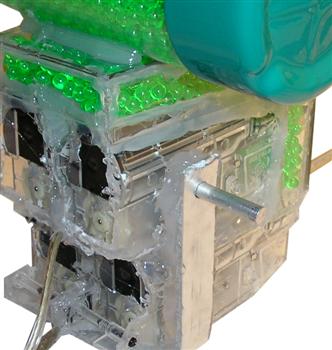
Next hot glue the inner part of the frame to the air soft turret. Any gaps just pump extra glue into to make sure a good strong bond is made. it is important to get this as close as possible to the center of balance as possible.
With the cradle in place test fit the lower part of the cradle to make sure it fits well and has full freedom of motion. Use washers to make sure its not binding on the inner part of the cradle.
With the lower part of the cradle removed, use the blank servo horn to mark center of the lower cradle and where it should line up.
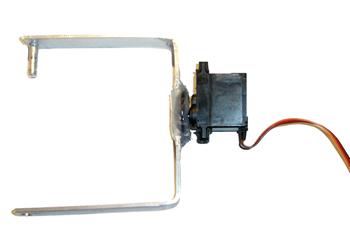
Using a healthy amount of hot glue, mount the servo horn to the lower cradle arm. Make sure this is fully cool before moving on to other steps.
Now for the rest of this article we will be using a transparent base as an example for write up purposes only. Feel free to use your imagination and build a turret base that fits your desires. I will make one recommendation though. With the green bb’s and the shape of the turret (minus the hopper) it sure would look cool as a turbo laser tower like those in starwars.
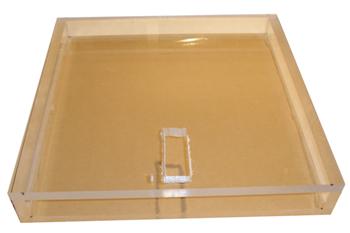
Our first step is to cut a hole for the servo to sit in that holds the airsoft turret.
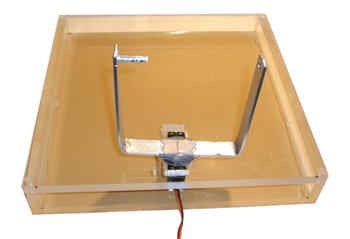
Next up is to mount the servo and lower part of the cradle to the plexy. Hot glue in layers worked very well for this.
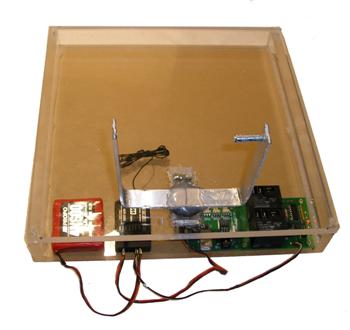
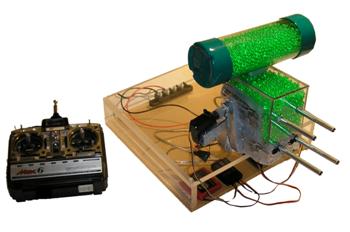
Now mount the electronics to the turret base. In our project here we have the battery to the radio receiver, radio receiver, usb servo controller, and relay kit.
Next we will be using a small terminal block for the power distribution system. The power supply we are using is a 12V 1000MA supply. It seems to drive the guns just fine and increase their rate of fire by about 50%.

Next using a spare servo horn cut it down to the minimum size to keep the threads and enough surface area so you can glue it to the shaft coming out from the inner part of the cradle.
Finaly bend an “L” shaped piece of aluminum to be used as a mounting flange for the servo. Use a self tapping screw or pop rivet to secure it to the main part of the lower cradle. Test for up down movement. If you didn’t mount the inner cradle to the center of the balance point for the turret you can adjust it by attaching counter weights. This will reduce servo stress and increase battery time if you build it out for RC use.
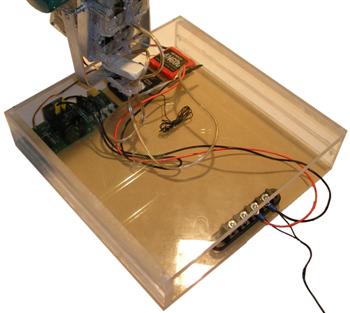
So version 2.0 is done. We really focused on creating as diverse as a platform as possible. One side effect is that it seems a little diluted. So I recommend you go with either USB or RC and not both. Either way after doing some testing and tuning we were able to get our gun up to about 1500 rounds per minute. Or about 25 rounds a second using these cheap guns. I was let informed by a fan that there are electric airsoft guns that will shoot up to 1100 round a minute by their self’s. Imagine 4 of those running at the same time!
I have to make a confession though. As cool as this project is it sat on my desktop for almost a month now untouched. I had to really push myself to finish the write up as I am working on a new project… call it a version 3.0 loosely based on this concept as well as a new site to match it. I can’t divulge many details now. But if all goes to plans. And vendors deliver parts in a timely manner we should have this new article, and site up at the end of February. So stay tuned for more amazingly awesomeness.
Alright… I bit the bullet and set up a youtube account for inventgeek. I supose that’s not all bad. And I have to admit im a little excited about the chance to put more videos on the site for you all.
Related Posts


1 Comment
Hello,
What a great project do you have, this airsoft guns are perfect useful in the RC. My hobby F-16 jet in scale 1/12 and an f-16 has one 20mm automatic gun Vulcan M61.
The most airsoft guns has Caliber of 6mm, this is to big for a 1/12 F-16.
It is possible that a flame or spark from the barrel, every time the air comes out of the barrel?
And can you tell me what I need to parts so i can make this?
Almost thanks regards,
Ron