
Time for another flaming monstrosity. How about nice Xerox laser printer converted to a high volume automatic paper shredder? This project was featured on 8/3/05 on toms hardwares how to section. Now, here it is, un-cut and un-molested by the Toms Hardware “editors” in all its sarcastic glory!
Overview:
They say that creativity is the mother of invention. But sometimes raw unadulterated ignorance can foster ideas just as grand. The idea for this project actually came to me by a mix of creativity, and the common ID10T Error. My good friend Mike owns a quickly growing software development firm. He also has a mountain of sensitive documents that seems to grow as quickly as his business, piling up next to his paper shredder. Being a small business owner he prints all of his documents in house. Generally speaking CEOs and small business owners are not always the most technical of people, so the concept that a laser printer gets hot is not always in the forefront of their minds. After attempting to use a new special plastic based paper, the printer feeding in sheet after sheet and not returning a single sheet, he realized there might be a problem. Upon closer inspection several pages of this special paper had melted in the printer and completely destroyed it. The ultimate paper jam.
About the same time I decided to see if I could find an automatic bulk paper shredder solution for him. Sure enough I was able to find some options, but they ranged from $3000 – $12000. Obviously that wouldnt do for the creative-minded geek. So after some brainstorming and a lightning strike or two, I had the idea to modify the remnants of the laser printer to fill the role. As this is going to be a volume based solution we needed a robust and well built paper feed mechanism, and a solid feed rate. Xerox has built their reputation on the quality and performance of their printers. Of course, with a reputation like that, what self respecting modder wouldnt jump at the opportunity to apply a personal spin to it?
This is really a relatively simple build. Most of the time spent (and a good portion of the fun) is actually tearing the printer apart so as to address any potential heat sources and therefore any potential fire hazards (we will still make sure you get to play with fire later). The parts for this build are readily available through several means. We will list the sources and prices for all the parts below.

The Printer:
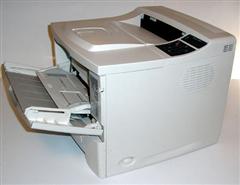
This is ultimately the main part of this build. In this build we will be using the XEROX 3450/B this is a very capable laser printer at 25 Pages Per Minute. The lower tray is capable of 500 sheets of paper in both letter and legal sizes. The upper tray is a multi-purpose tray capable of 100 sheets, and is better with thicker materials. The printer retails new for about $500.00 USD, but eBay and refurbished units can range from $200 – $400. Now, due to time and budget constraints we passed on some of the features we wanted to use from the printer. For instance… using the toner cartridge to limit the number of pages shredded and force you to buy a new shredder cartridge, every 50K pages or so. Or perhaps a printer bios upgrade to even print at all after 250,000 pages or so.
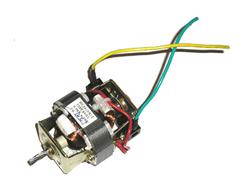
The Motor:
For simplicitys sake in this build we will be replacing the existing main drive motor in the printer. The reasoning behind this is the original motor is a stepped motor and it would take longer, and cost more in parts to build a controller for it than it would to replace the motor outright with an AC motor. This motor is actually scavenged from an additional paper shredder that we will be using in this build. The drive shaft of this motor is a worm gear that matched the gearing where the original one had been mounted. As the cost of this motor is the price of the paper shredder, we will it at $15.00.
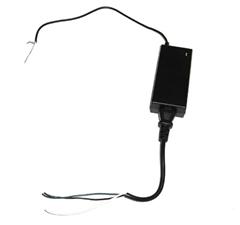
The DC Power Supply:
One of the reasons for our choice of the printer we choose (excluding the free price tag) was the existing mechanics and the simplicity of operation. The down side is that we will be stripping all the existing electronics out of the unit, excluding 3 solenoids. We will need a DC based power supply at about 5V to power these units. It just so happened that I had a Samsung brick at 4.75V DC just lying around. I really like the shape and size of this transformer because it is thin enough to be hidden inside the side cowls of the existing space. These transformers are used in all sorts of electronic components and are readily available on eBay for $5.00.
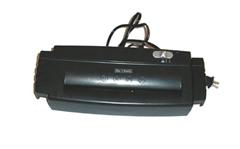
The Paper Shredder (Qty – 2):
I tried many, many paper shredders out there before I found one I was satisfied with. Believe it or not, I chose a $15 shredder from Wal-Mart in the end. The Aurora 5 Sheet Strip-Cut Paper Shredder was the fastest paper shredder I could put my hands on. It has only a strip type cutter in it, but thats good enough for what our needs. It also sports thermal overload protection on the motor and will shut itself down before unsafe conditions are met. Not to mention when we are done with the shredder, or it wares out we can return it back to Wal-Mart, and there highly trained staff will most likely take it back and refund our money.
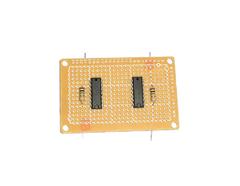
The solenoid controller:
The solenoid controller is the key to this unit. This is basically nothing more than a glorified LED Flasher, but instead of LEDs, we will be driving the solenoids in the printer with its output. The speed of the flash (or drive-rate in this case) can be hard set via resistor, capacitor or variable. After some tinkering with a bread board, we chose a basic circuit to drive the solenoids for a feed rate that doesnt overload the paper shredder. We built redundant circuits to control the solenoids on the upper tray and lower tray independently, thus allowing for independent feed rates as well.
Disassembly and Preparation:
Screwdrivers at the ready! This section is meant to be somewhat conceptual as you likely wont be working with the same printer. Even so, the concepts are really universal in all printers: rollers moving paper, and relays or solenoids feeding the paper into the rollers. We liked this printer because it has a lot of room to work with, as well as being generic enough looking to be cool for the task at hand.
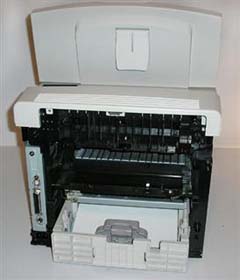
The main goal of the teardown is 2-fold. First: to remove anything we dont need so we have space to mod stuff. Second: fire prevention. Laser printers have many high-heat-generating surfaces in them capable of acting as an ignition source (as my friend learned the hard way – a $600 mistake… ouch). The best practice is to remove ALL non essential parts if possible. So we started with the basics. We have removed the rear access panel and fuser in the printer. The fuser is where the toner is bonded to the paper. This occurs under high heat. If fine paper pieces were able to accumulate, there would be a fire for sure.
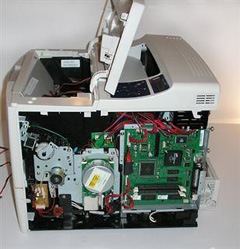
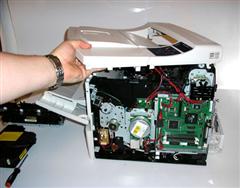
Next up, we will be removing the side panels from the unit. There are a few components to locate and remove: any form of computer processing unit, power supplies, and in this case the stepped motors, as they would be impractical to get running independently on a budget. Items we want to watch for and keep are items like relays and solenoids. Our printer has 3 solenoids, but other printers only one. This part is the most important item to keep intact to make this project work.
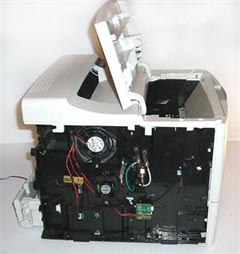
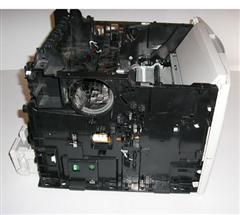
Next is the other side of the printer. This side is where the active cooling (oxygen providing) solution to the printer can be found, as well as the connections and high voltage contact points for the toner cartridge. Remove these items also.
By removing the top we can dig in further and find the laser unit as well as more wiring that needs to be removed. The toner cartridge should be removed at this point if you havent done so already. Now with this printer, the toner cartridge actually contains a feed roller that is critical to our solution, so we will be saving the toner cartridge and replacing it in the printer/shredder before operating it.
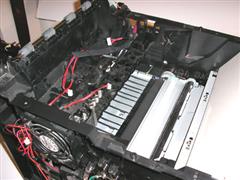
With the toner cartridge and laser unit removed you can see just how much room we have in this printer for tinkering. Remove all circuit boards and wires so there is no chance of them falling into the feeder. While watching this item cannibalize itself might sound super fun, it turns out that it’s not very safe or cost effective in the long run.
Remove all the fans, circuit boards and wires as well from the side panels of the printer. Remove the main processor unit for the printer and all associated wiring as well. Finally, replace the top cover and side panel on the side with no motors under them, and be sure to screw them down.
Disassembly and Preparation:
Screwdrivers at the ready! This section is meant to be somewhat conceptual as you likely wont be working with the same printer. Even so, the concepts are really universal in all printers: rollers moving paper, and relays or solenoids feeding the paper into the rollers. We liked this printer because it has a lot of room to work with, as well as being generic enough looking to be cool for the task at hand.
The main goal of the teardown is 2-fold. First: to remove anything we dont need so we have space to mod stuff. Second: fire prevention. Laser printers have many high-heat-generating surfaces in them capable of acting as an ignition source (as my friend learned the hard way – a $600 mistake… ouch). The best practice is to remove ALL non essential parts if possible. So we started with the basics. We have removed the rear access panel and fuser in the printer. The fuser is where the toner is bonded to the paper. This occurs under high heat. If fine paper pieces were able to accumulate, there would be a fire for sure.
Next up, we will be removing the side panels from the unit. There are a few components to locate and remove: any form of computer processing unit, power supplies, and in this case the stepped motors, as they would be impractical to get running independently on a budget. Items we want to watch for and keep are items like relays and solenoids. Our printer has 3 solenoids, but other printers only one. This part is the most important item to keep intact to make this project work.
Next is the other side of the printer. This side is where the active cooling (oxygen providing) solution to the printer can be found, as well as the connections and high voltage contact points for the toner cartridge. Remove these items also.
By removing the top we can dig in further and find the laser unit as well as more wiring that needs to be removed. The toner cartridge should be removed at this point if you havent done so already. Now with this printer, the toner cartridge actually contains a feed roller that is critical to our solution, so we will be saving the toner cartridge and replacing it in the printer/shredder before operating it.
With the toner cartridge and laser unit removed you can see just how much room we have in this printer for tinkering. Remove all circuit boards and wires so there is no chance of them falling into the feeder. While watching this item cannibalize itself might sound super fun, it turns out that it’s not very safe or cost effective in the long run.
Remove all the fans, circuit boards and wires as well from the side panels of the printer. Remove the main processor unit for the printer and all associated wiring as well. Finally, replace the top cover and side panel on the side with no motors under them, and be sure to screw them down.
Testing and configuration:
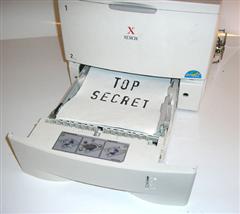
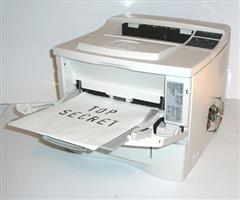
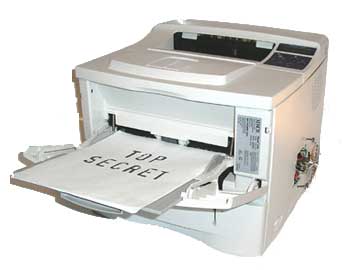
The testing phase of this build is really fairly straight forward. We loaded the printer with all our Top Secret documents… you know the type… secret government projects, or our tinfoil hat patterns, some alien autopsy documents, and our report cards from the 8th grade…. Anywho, using the switch we installed in the rear for the solenoid control (remember the glorified LED flasher?), select the lower tray and press the power button. If you have tested this right, it should work without a hitch. Now, depending on how you constructed your solenoid controller you may also have a variable resistor instead of a fixed speed. This is the time to really tune the printer and make sure you are feeding at a rate the shredder can handle.
With the printer feeder selector in the upper tray mode, load the upper tray with up to 100 sheets of paper and make sure it feeds appropriately. Now, we found that the feed rate is a bit different with upper feeder selected, and I am sure this is similar on other printer types. We used a different resistor to set the pulse rate a little slower and it worked well. If you are using the variable resistor model, now is a great time to give it that little tweak.

Final Setup:
So there is the output. One item we failed to include in this build was a bagging system. We actually used a large 60 gallon trash can as ours, with a sheet of plywood as a table top, and a hole into which the paper falls. I dont recommend attaching a bag to the paper shredder directly, as it does get rather warm in extended operation. But left unattended at 25 pages per minute, it really gets the job done. So you can move on to the important task of creating more of the documents that will see the anti-printer in a few more days.
Final Thoughts…
So there you have it. This was a fairly simple and fun build-out to do. It was a fair bit cheaper than buying an industrial solution, and operates very well. But as with most unusual mods, many philosophical questions came to light during the implementation of this project, primarily:
Why do we have to either call a service, or stand over a shredder to shred our documents?
If paper = wood, shred = chuck and printer = woodchuck, then (wait for it…) How much wood could a woo.. nevermind.
There are more things you could do to extend this project: You might build it to print the pages, and directly feed them back into the shredder, for instance. This might not be as useful, but it could be loads of fun! This is especially good for TPS reports.
All things considered, the cost on this was about right, and way less than the out-of-the-box solution. We built something useful that operates quite well, we had fun in the process, and our friend Mike is eternally grateful to us for solving his dilemma.
Until next time. . .


